 |
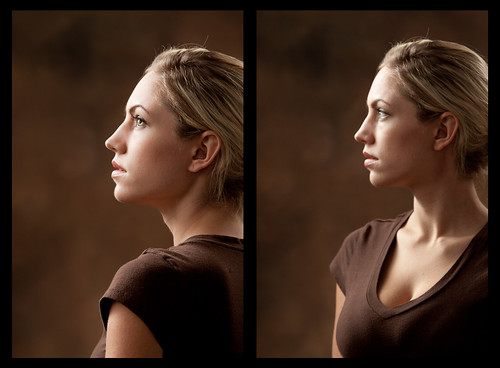
| Jade - Profile Poses |
The Lighting
 Both profile images above were shot with the lighting setup shown in the diagram to the left.
The main (key) light was high on the left and behind the model to illuminate the front of the her face but leave her her cheek closest to the camera in shadow. The key light was set at f/4 meaning that the power output of the light was set to correctly expose the model's face when the camera's aperture was set at f/4. (Note that the shutter speed only effects the ambiant light exposure, so in this case I had it set to 1/200 of a second, but it could have been anything less than my camera's maximum flash-sync speed--which is 1/250 of a second--and anything greater than, say, 1/125 of a second to ensure I didn't capture any of the room's ambient light.)
The light on the right was used as a rim/hair light. It was approximately two stops below the key. You can see the effect it had on the back of the model's neck. Finally, we lit the background with a third strobe placed behind the model.
The Poses
Let's start with posing the model's body and work our way up to the model's head and eyes ...Her Body
In a profile shot you have two choices when it comes to the model's body; you can either turn her body toward the key light with her back to the camera as in the first photo, or turn her away from the light with her front to the camera. Which pose you choose might depend, for example, on whether or not you want to show the back of a bride's dress.You might want to consider avoiding turning the model's body 90 degrees to the camera. I tried that, and the resulting image looked stiff and uninteresting.
Her Shoulders
As with most other poses, you might want to consider having your model drop the shoulder farthest from the camera. The idea here is to create diagonals with her shoulders that lead the viewer to the model's face and help to break-up any horizontal lines in the image that might make it look a bit boring.Her Head
This is a profile shot, so basically you want your model's head turned 90 degrees to the camera. You might also consider asking the model to raise her chin slightly as shown in the left-hand image above, but that's just a personal preference. Do as you please.Now's a good time to also talk about composition. In a profile shot, you want to create a lot of space between the model's face and the edge of the frame. I.e. you want to give her image someplace to look. If you don't, it'll appear as if she's staring into a wall.
Her Eyes
If you look at the two images carefully, you'll notice in the left-hand image that I asked Jade to turned her eyes slightly toward the camera in order to better see her iris. I failed to do that in the 2nd image. Don't let that happen to you. You'll want to avoid having her look hard out of the corner of her eye ... unless you want a creepy profile picture. ;-)One of my fellow classmates took a shot of Jade with her eyes closed. I liked it. It made for a very peaceful looking image.
That's it. To get a good profile portrait, put the main light behind and to one side of the model, pose her body relative to the light, and make sure you get her head and eyes posed just right.
No comments:
Post a Comment